Last Updated on May 20, 2026 by Digiinte.com Team
Let’s be honest nobody likes a slow website. If your Shopify store takes more than 3 seconds to load, most visitors will simply leave. And the biggest culprit behind slow stores? Images.
Images are the heart of any online store. They show off your products, build trust, and drive purchases. But if they’re not optimized properly, they can quietly kill your store’s performance, tank your SEO rankings, and cost you real sales.
- Why Image Optimization Matters for Your Shopify Store
- Step 1: Choose the Right Image Format
- Step 2: Compress Your Images Before Uploading
- Step 3: Use Descriptive, SEO-Friendly File Names
- Step 4: Add Alt Text to Every Image
- Step 5: Enable Lazy Loading for Images
- Step 6: Use Shopify’s Built-In Image Optimization Features
- Quick Checklist: Shopify Image Optimization
- Bonus: Top Shopify Image Optimization Apps
- Final Thoughts
- Frequently Asked Questions (FAQ)
The good news? Optimizing images for Shopify is not as complicated as it sounds. In this guide, we’ll walk you through everything the right image formats, how to compress images without losing quality, and how lazy loading can transform your store’s speed.
Let’s get started.
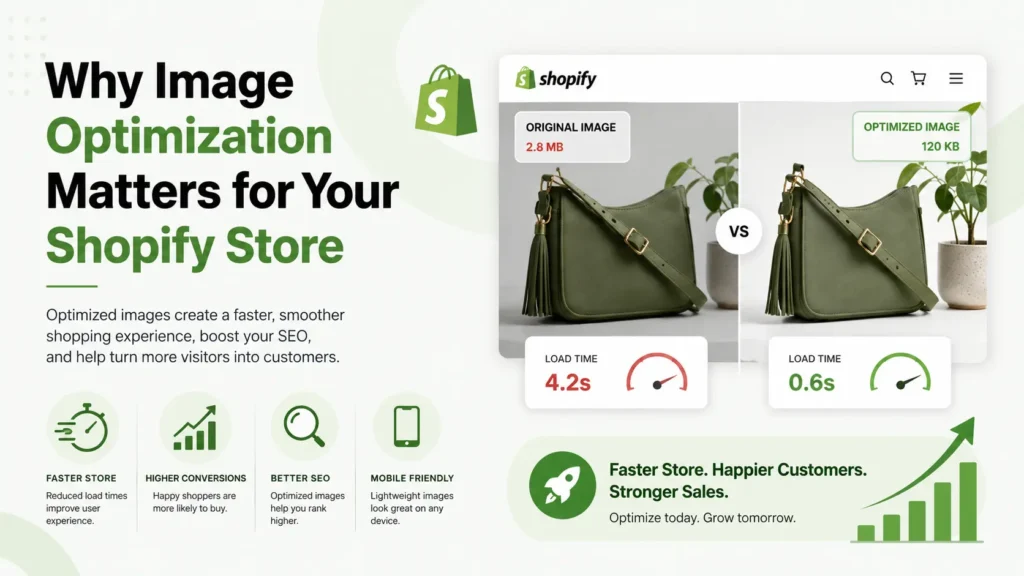
Why Image Optimization Matters for Your Shopify Store
Before we jump into the how, let’s quickly understand the why. Here’s what unoptimized images can do to your Shopify store:
- Slow down your page load speed (even on good internet connections)
- Lower your Google search rankings (page speed is a confirmed SEO factor)
- Frustrate mobile shoppers (who make up over 70% of traffic)
- Reduce conversions and increase bounce rate
According to Google, 53% of mobile users abandon a site that takes over 3 seconds to load. That’s more than half your potential customers gone just because of slow images.
On the flip side, optimizing your images can improve your Shopify speed score, help you rank higher on Google, and deliver a smoother shopping experience that converts visitors into buyers.
Step 1: Choose the Right Image Format
Not all image formats are equal. Choosing the wrong one can add unnecessary bulk to your pages. Here’s a quick breakdown of the most common formats and when to use them:
1. WebP – The Best Choice for Most Images
WebP is a modern image format developed by Google. It offers significantly better compression than JPEG or PNG typically 25–35% smaller file sizes — without losing visible quality. Shopify actually converts your uploaded images to WebP automatically when serving them to supported browsers (most modern browsers support WebP).
Best for: Product photos, banners, hero images
Note: Always upload high-quality source images (JPEG or PNG) – Shopify handles the WebP conversion for you.
2. JPEG – Great for Photography
JPEG is the classic format for product photography. It handles rich colors and gradients well and compresses nicely. Just make sure to save JPEGs at 70–80% quality — that’s the sweet spot between file size and visual quality.
Best for: Product photos, lifestyle shots, backgrounds
3. PNG – For Transparency
PNG files support transparency, which makes them perfect for logos, icons, and product images with transparent backgrounds. However, PNG files tend to be larger than JPEG, so only use them when you actually need transparency.
Best for: Logos, icons, product images on white or transparent backgrounds
4. GIF – Avoid Unless Necessary
GIFs are fun for animations, but they’re heavy and low quality. If you need animated visuals, consider using short MP4 videos instead they load faster and look much better.
Avoid for: Large banners or product imagery. Use only for small animated elements.
Step 2: Compress Your Images Before Uploading
Even if you’re using the right format, uploading massive image files will still slow your store down. Always compress your images before uploading them to Shopify.
Best Compression Tools:
- TinyPNG / TinyJPEG (tinypng.com) – Simple drag-and-drop compressor. Reduces file size by up to 70% without visible quality loss. Great for quick compression before uploading.
- Squoosh (squoosh.app) – Free Google tool that gives you full control over format, quality, and size. Excellent for comparing output quality side by side.
- ImageOptim (Mac only) – Drag images in and get compressed versions instantly. Works great for batch optimization.
- Shopify Apps (like TinyIMG, Crush.pics, ImageOptimizer) – These apps automatically compress images as you upload them to Shopify. Perfect if you have a large catalog.
What Size Should Your Shopify Images Be?
Here are some ideal image size guidelines for Shopify:
- Product images: 2048 x 2048 px (square format is recommended)
- Collection images: 1024 x 1024 px
- Banner / hero images: 1200–2000 px wide (under 200 KB recommended)
- Blog images: 1200 x 630 px (ideal for social sharing too)
Pro Tip: Aim to keep most images under 200 KB. Anything above 500 KB will noticeably slow your pages.
Step 3: Use Descriptive, SEO-Friendly File Names
This one is often overlooked but it’s super important for SEO. Before uploading an image to Shopify, rename the file to something descriptive.
Bad:
IMG_2047.jpg or photo1.png
Good:
red-leather-handbag-women-shopify.jpg
Google uses image file names to understand what the image is about. A good file name with relevant keywords can help your product images show up in Google Image Search, which drives additional free traffic to your store.
Step 4: Add Alt Text to Every Image
Alt text (alternative text) serves two purposes: it helps visually impaired users understand your images, and it tells search engines what your image shows.
To add alt text in Shopify:
- Go to your Products page in Shopify Admin
- Click on a product and scroll to the images section
- Click on an image and select “Edit alt text”
- Add a short, descriptive sentence that includes your primary keyword naturally
Example Alt Text:
“Women’s red leather handbag with gold zipper – handmade in Italy”
Keep it natural, relevant, and under 125 characters. Don’t stuff keywords.
👉 Want to fix all speed issues at once? Read our full guide: How to Improve Shopify Store Speed: 10 Proven Optimization Tips
Step 5: Enable Lazy Loading for Images
This is where things get really interesting. Lazy loading is a technique that delays loading images until the user actually scrolls down to see them. Instead of loading all images on a page at once (which takes forever), lazy loading loads only what’s visible on screen first, then loads the rest as the user scrolls.

How Does Lazy Loading Help?
- Faster initial page load – your page feels snappier right away
- Better mobile performance – especially important for users on slower mobile connections
- Improved Core Web Vitals scores – particularly LCP (Largest Contentful Paint)
- Lower bandwidth usage – visitors who don’t scroll to the bottom don’t load those images at all
How to Enable Lazy Loading on Shopify
Option 1: Use a Modern Shopify Theme
Most modern Shopify themes (like Dawn, Debut, or any recently updated theme) already have lazy loading built in. Check your theme documentation or reach out to the theme developer.
Option 2: Add loading=”lazy” to Image Tags
If you’re comfortable editing Shopify Liquid code, you can add the loading=”lazy” attribute to image tags in your theme. This is the native HTML5 way to enable lazy loading and is supported by all major browsers.
Option 3: Use a Shopify App
Apps like TinyIMG, Booster SEO, or PageFly can enable lazy loading without touching any code. These are great for store owners who prefer a no-code approach.
Important: Don’t lazy load above-the-fold images (the ones visible without scrolling). Those should load immediately to avoid a poor first impression.
Step 6: Use Shopify’s Built-In Image Optimization Features
The good news is that Shopify already does quite a bit of heavy lifting for you:
- Automatic WebP conversion: Shopify automatically serves WebP versions of your images to browsers that support it
- Global CDN (Content Delivery Network): Your images are served from Shopify’s global CDN, so they load quickly for customers around the world
- Responsive image sizing: Shopify automatically generates multiple sizes of your images and serves the right size based on the device
- HTTPS delivery: All images are served securely over HTTPS
These built-in features are powerful, but they don’t replace the need to properly size and compress your images before uploading.
Quick Checklist: Shopify Image Optimization
Here’s a handy checklist to make sure you’ve covered all the bases:
- ☑️ Use WebP or JPEG format for product images
- ☑️ Use PNG only when transparency is needed
- ☑️ Compress all images before uploading (aim for under 200 KB)
- ☑️ Resize images to the recommended dimensions for each use case
- ☑️ Use descriptive, keyword-rich file names
- ☑️ Add meaningful alt text to every image
- ☑️ Enable lazy loading (via theme, code, or app)
- ☑️ Avoid lazy loading images above the fold
- ☑️ Test your store speed after changes using Google PageSpeed Insights or Shopify’s Speed Dashboard
Bonus: Top Shopify Image Optimization Apps
If you want to automate the process, here are some top-rated apps:
- TinyIMG – All-in-one image compression, alt text automation, and lazy loading
- Crush.pics – Bulk image compression and resizing tool
- ImageOptimizer – Lightweight, easy-to-use image compressor
- Booster SEO & Image Optimizer – Combines SEO tools with image optimization
These apps save hours of manual work and are worth it if your store has a large catalog.
Final Thoughts
Optimizing your Shopify images isn’t just a one-time task – it’s an ongoing habit that pays off in a big way. Every image you compress, rename, and lazy load is a small improvement that adds up to a noticeably faster, better-performing store.
A faster store means happier customers, lower bounce rates, better Google rankings, and most importantly more sales.
Start small – pick your top 10 product images today, compress them, rename them, and add proper alt text. Then test your speed score. You’ll be amazed at the difference even small changes can make.
Have questions about image optimization or need help speeding up your Shopify store? Feel free to reach out or drop a comment below.
Frequently Asked Questions (FAQ)
Here are some of the most common questions store owners ask about Shopify image optimization: