

Last Updated on September 15, 2026 by Digiinte.com Team
To add a super admin in WordPress Multisite, go to My Sites, then Network Admin, then Users. Find the user you want to promote, click Edit, scroll down and check the box that says “Grant this user super admin privileges for the Network,” then click Update User. If you are locked out, you can also do this via WP-CLI or by editing the database directly.
- Why Super Admin Access Matters in WordPress Multisite
- What Is a Super Admin in WordPress Multisite
- Method 1: Add Super Admin via the Network Admin Dashboard (Recommended)
- Method 2: Add Super Admin Using WP-CLI (For Developers)
- Method 3: Add Super Admin via the Database (Emergency Recovery)
- How to Verify Super Admin Access Was Granted Successfully
- How to Remove Super Admin Privileges in WordPress Multisite
- Super Admin vs Administrator: Key Differences Explained
- Super Admin Security Best Practices for WordPress Multisite
- Common Problems and How to Fix Them
- Frequently Asked Questions
- Conclusion: Managing Super Admin Roles in WordPress Multisite
Why Super Admin Access Matters in WordPress Multisite
Managing a WordPress Multisite network is a completely different experience from running a single website. You have multiple sites under one roof, shared plugins and themes, and users who need different levels of access across different parts of the network.
At the top of the permission hierarchy sits the Super Admin. This role controls everything: every subsite, every plugin, every user, and every network-wide setting. Assigning it correctly keeps your network running smoothly. Assigning it carelessly is how networks get broken.
If you have ever searched for how to add a super admin in WordPress Multisite, you are probably in one of two situations. Either you are onboarding a trusted team member who needs network-level control, or you have lost access and need to restore it fast. This guide covers both scenarios with clear, step-by-step instructions.
We will walk through three methods: the standard dashboard method that works for most people, the WP-CLI method for developers and server managers, and the database method for emergency recovery when you are locked out completely. We will also cover how to remove super admin access, common mistakes to avoid, and how to keep your multisite network secure.
What Is a Super Admin in WordPress Multisite
Before jumping into the steps, it helps to understand exactly what the Super Admin role is and how it differs from a regular Administrator.
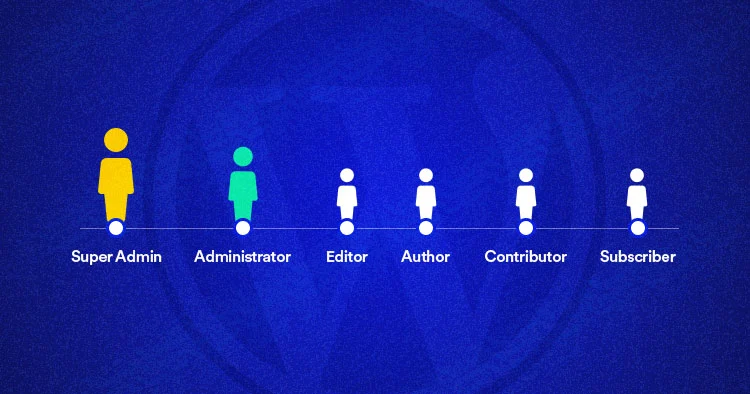
In a standard single-site WordPress installation, the Administrator is the highest role available. They can manage posts, pages, users, plugins, themes, and all site settings. That is as high as the permission tree goes.
WordPress Multisite adds one more level above Administrator: the Super Admin. This role exists only in a multisite network and has the following capabilities that regular Admins do not.
| Capability | Regular Admin | Super Admin |
| Manage posts and pages on one site | Yes | Yes |
| Install and activate plugins | Only if allowed by network | Yes, network-wide |
| Install and switch themes | Only if allowed by network | Yes, network-wide |
| Add and manage users on one site | Yes | Yes, across all sites |
| Access Network Admin dashboard | No | Yes |
| Create or delete subsites | No | Yes |
| Manage network-wide settings | No | Yes |
| Grant or revoke Super Admin to others | No | Yes |
Be cautious: A Super Admin can make changes that affect every single site in your network simultaneously. Only give this role to people you completely trust. One wrong setting change or plugin activation can break every subsite at once.
Method 1: Add Super Admin via the Network Admin Dashboard (Recommended)
This is the standard method and the one you should use in almost all situations. It does not require any code, plugins, or server access. All you need is an existing Super Admin login.
Step 1: Log In to Your WordPress Multisite Network
Open your browser and go to your Multisite login page. This is usually yourdomain.com/wp-admin. Log in with your credentials. You must be logged in as an existing Super Admin to access the network administration area.
Step 2: Access the Network Admin Dashboard
After logging in, look at the top left corner of your WordPress admin bar. You will see a menu called My Sites. Hover over it. A dropdown appears with two options: your individual sites and Network Admin at the top. Click Network Admin, then click Dashboard.
This brings you to the Network Admin dashboard, which is separate from the regular site dashboard. You will notice the left sidebar now shows network-level menus including Sites, Users, Themes, Plugins, and Settings. This is the control panel for your entire multisite installation.
Note: If you do not see Network Admin in the My Sites dropdown, you are not logged in as a Super Admin. You will need to use Method 2 or Method 3 below to gain access.
Step 3: Add a New User to the Network (If Needed)
If the person you want to make Super Admin does not already have an account in your multisite network, you need to create one first.
- In the Network Admin dashboard, click Users in the left sidebar.
- Click Add New at the top of the Users page.
- Enter the username and email address for the new user. Unlike single-site WordPress, the multisite user creation screen only asks for these two fields. No role is assigned here yet.
- Click Add User. WordPress sends the new user an email with a link to set their password.
Step 4: Edit the User Profile to Grant Super Admin
Whether the user is new or already exists in your network, the process to grant Super Admin is the same.
- In the Network Admin dashboard, go to Users, then All Users.
- Find the user in the list. You can use the search box at the top right if you have many users.
- Click Edit under their username.
- Scroll down the user profile page until you see a section called Super Admin.
- Check the box that says Grant this user super admin privileges for the Network.
- Scroll down and click Update User.
Done! The user now has Super Admin access to your entire WordPress Multisite network. Ask them to log out and log back in for the changes to take effect in their dashboard.
Method 2: Add Super Admin Using WP-CLI (For Developers)
WP-CLI is the command-line interface for WordPress. If you manage your server directly or work in a hosting environment that supports SSH access, this method is faster and more reliable than the dashboard approach.
This method is also useful when you need to grant Super Admin access to multiple users at once or when you want to script the process as part of a deployment workflow.
Prerequisites for WP-CLI Method
- You need SSH access to your server.
- WP-CLI must be installed on your server. Most managed WordPress hosts (Kinsta, WP Engine, Cloudways) include it by default.
- You need to run the command from your WordPress root directory.
The WP-CLI Command
Open your terminal, connect to your server via SSH, and navigate to your WordPress root directory. Then run the following command:
wp super-admin add username –url=https://yourdomain.com
Replace “username” with the actual WordPress username of the person you want to promote. Replace the URL with your network’s primary domain.
To verify the change worked, run:
wp super-admin list –url=https://yourdomain.com
This displays a list of all current Super Admins on your network. Confirm the username appears in the output.
Granting Super Admin to Multiple Users at Once
If you need to add several Super Admins in one go, you can chain the usernames in a single command:
wp super-admin add username1 username2 username3 –url=https://yourdomain.com
Tip: Always take a full database backup before running WP-CLI commands that modify user permissions. If something goes wrong, a recent backup is your fastest recovery option.
Method 3: Add Super Admin via the Database (Emergency Recovery)
This method is for situations where you are completely locked out of your WordPress Multisite network and have no existing Super Admin login to use. It involves directly editing the WordPress database through phpMyAdmin or a similar database management tool.
Only use this method as a last resort. Editing the database incorrectly can break your entire WordPress installation. If you are not comfortable with database editing, contact your hosting provider’s support team first.
Step 1: Access phpMyAdmin
Log in to your web hosting control panel (cPanel, Plesk, or similar). Find and open phpMyAdmin. Select your WordPress database from the list on the left side panel.
Step 2: Find the sitemeta Table
In the list of database tables, look for a table called wp_sitemeta. The prefix may be different on your installation (for example, wp2_sitemeta or custom_sitemeta) depending on how WordPress was configured.
Click on wp_sitemeta to open it. Use the search function to find the row where the meta_key column contains the value site_admins.
Step 3: Edit the site_admins Field
Click Edit on the site_admins row. You will see the meta_value field containing a serialized PHP array that lists the usernames of all current Super Admins. It looks something like this:
a:1:{i:0;s:5:”admin”;}
To add a new Super Admin, you need to add their username to this array. If the current value shows one admin with username “admin” and you want to add a user with username “john,” the updated value should look like:
a:2:{i:0;s:5:”admin”;i:1;s:4:”john”;}
The number after “a:” is the count of Super Admins. The “s:” value is the character count of the username. In the example above, “john” has 4 characters so it reads s:4:”john”.
- Update the count after “a:” to reflect the new total number of Super Admins.
- Add the new entry following the same serialized format as the existing entries.
- Double-check your character counts. An incorrect count breaks the serialization and can make your site inaccessible.
- Click Go to save the changes.
Critical warning: Serialized PHP data is extremely sensitive to formatting errors. One wrong character breaks the entire array and can crash your site. Copy the existing value to a text editor first, make your changes there, then paste the corrected value back. Never type directly into the phpMyAdmin field without verifying your changes first.
How to Verify Super Admin Access Was Granted Successfully
After using any of the three methods above, it is important to confirm the change actually worked before you consider the task complete. Here are four ways to verify.
- Dashboard check:
Ask the user to log in and hover over My Sites in the admin bar. If they see Network Admin in the dropdown, they have Super Admin access.
- Network Users list:
In Network Admin, go to Users and then All Users. Super Admins show a star or network badge next to their username depending on your theme.
- WP-CLI verification:
If you used Method 2, run wp super-admin list to confirm the username appears in the output.
- Plugin management test:
Ask the user to go to Network Admin and then Plugins. If they can see and manage all network plugins, their Super Admin access is working correctly.
How to Remove Super Admin Privileges in WordPress Multisite
Removing Super Admin access is just as important as granting it. When a team member leaves, changes roles, or no longer needs network-level access, you should revoke their Super Admin status immediately.
Remove via Dashboard
- Go to Network Admin, then Users, then All Users.
- Find the user and click Edit.
- Scroll to the Super Admin section.
- Uncheck the box that says Grant this user super admin privileges for the Network.
- Click Update User.
Remove via WP-CLI
Run the following command from your server via SSH:
wp super-admin remove username –url=https://yourdomain.com
Verify the removal by running wp super-admin list and confirming the username no longer appears.
When removing Super Admin access, do not delete the user account unless they are leaving the organization entirely. Instead, revoke Super Admin and assign them an appropriate role on the specific subsites they still need to access. This preserves their content attribution and access history.
Super Admin vs Administrator: Key Differences Explained
This is one of the most commonly confused aspects of WordPress Multisite. Here is a clear side-by-side comparison to help you understand when to use each role.
A Regular Administrator manages a single subsite. They can create and edit posts, manage users on their specific site, change that site’s settings, and use the plugins and themes that the Super Admin has made available to the network. They cannot install new plugins or themes without Super Admin approval, and they cannot access any other subsite in the network.
A Super Admin manages the entire network. They see every site, every user, and every setting. They can install plugins that become available across the network, create and delete subsites, and assign or revoke Super Admin access to other users. Nothing in the network is outside their reach.
The practical rule is simple. Give most people Administrator access to the specific sites they manage. Only give Super Admin to the people who need to manage the network itself: your lead developer, your IT manager, or a backup admin for emergency recovery.
Super Admin Security Best Practices for WordPress Multisite
Because Super Admin has unlimited access to your entire network, every Super Admin account is a high-value target. Here is how to keep these accounts secure.
Limit the Number of Super Admins
Most networks need only two or three Super Admin accounts: the primary admin, a backup admin, and possibly a developer account. The more Super Admin accounts exist, the larger your attack surface. Audit your Super Admin list every three months and remove any accounts that are no longer actively needed.
Enable Two-Factor Authentication
Every Super Admin account should have two-factor authentication (2FA) enabled. WordPress does not include 2FA by default, but plugins like Wordfence, Google Authenticator, or WP 2FA make it straightforward to add. An attacker who obtains a Super Admin password cannot log in without the second factor.
Use Strong, Unique Passwords
Super Admin passwords should be at least 20 characters long, randomly generated, and stored in a password manager. Never reuse passwords from other services. If one password is compromised in a data breach, attackers routinely try it across multiple platforms.
Monitor Super Admin Activity
Install an activity logging plugin like WP Activity Log or Simple History. These plugins record every action taken by Super Admin accounts including login times, settings changes, plugin activations, and user modifications. If something breaks or a suspicious change occurs, the activity log tells you exactly what happened and when.
Keep WordPress Core and Plugins Updated
Outdated WordPress core files and plugins are the most common entry point for attackers. Enable automatic core updates for minor security releases. Review plugin updates weekly and apply them on a staging environment before pushing to production. A single vulnerable plugin can give an attacker a path to your entire multisite network.
Common Problems and How to Fix Them
Problem: I Cannot See Network Admin in My Dashboard
This means you are not currently logged in as a Super Admin. Your account either does not have Super Admin privileges or you are logging into a specific subsite rather than the network root. Use Method 3 (database) to manually grant Super Admin access to your account, or contact your hosting provider if you have lost access to the database as well.
Problem: The Super Admin Checkbox Is Not Appearing
The Super Admin checkbox only appears when you edit a user from the Network Admin dashboard. If you are editing a user from a single subsite’s admin panel, you will not see it. Make sure you are in Network Admin, then Users, not in the individual site’s Users section.
Problem: I Added the User to the Network but They Cannot Access Subsites
Adding a user to the network does not automatically give them access to individual subsites. After granting Super Admin, the user has network-level access. But if you want a regular Admin to access specific subsites, you need to add them manually from each subsite’s Users section and assign them an appropriate role there.
Problem: WP-CLI Returns “Error: User not found”
This error means the username you entered does not exist in the WordPress database. Double-check the exact username spelling. Usernames are case-sensitive in WP-CLI commands. Run wp user list to see all existing usernames and confirm the correct spelling before running the super-admin add command again.
Frequently Asked Questions
Conclusion: Managing Super Admin Roles in WordPress Multisite
Adding a super admin in WordPress Multisite is a straightforward process when you know where to look. For most situations, the Network Admin dashboard method takes under two minutes and requires no technical knowledge beyond knowing your login credentials. When you need speed or automation, WP-CLI gets the job done from your terminal. And when you are locked out entirely, the database method provides a reliable emergency recovery path.
The most important thing to remember is that the Super Admin role is not just an administrative convenience. It is the master key to your entire network. Treat it accordingly. Keep the number of Super Admins small, protect every account with strong passwords and two-factor authentication, and review your Super Admin list regularly.
Whether you are onboarding a new network manager, setting up a backup admin account, or recovering from a lockout, the steps in this guide give you everything you need to manage WordPress Multisite super admin roles safely and confidently.
🚀 Ready to set up your Super Admin? Start with Method 1 using the Network Admin dashboard. It is the safest and fastest option for most WordPress Multisite setups. If you run into any issues, the WP-CLI and database methods above have you covered.

Behind every post at digiinte.com is a team of experienced SEO analysts and digital growth specialists. Our insights are backed by real data, industry research, and hands-on campaign experience — so you get advice that actually moves the needle.